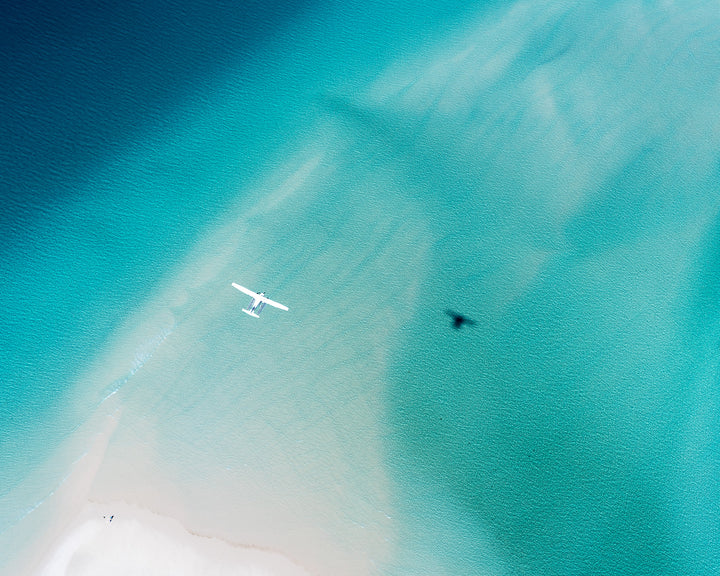
Aerial photography provides photographers a unique perspective; what may seem ordinary from the ground can be extraordinary from above. This is what excites me about aerial photography, as a landscape photographer, it has provided me a new way to see - where details of nature blend with perceptual angles to give a new viewpoint on the interrelationship between geography and art.
Aerial photography can be one of the most intimidating forms of photography as it is as challenging as it gets for a photographer. Many decisions need to be made to get spectacular results—everything from type of aircraft to subject matter and time of day. Teamwork is also required, as the photographer and pilot must communicate well for the photographer to get the desired images.
Here is a list of the key considerations of preparing and executing a successful aerial photography charter.
1. Understand what perspective you want to shoot – oblique or top down?
Aerial photographs are generally classified as being top-down (also referred to as vertical) or oblique. A top-down photograph is one which has been taken with the camera axis directed toward the ground as vertically as possible, while an oblique photograph is one which has been taken with the camera axis directed at an inclination to the ground.
Why would I shoot top-down?
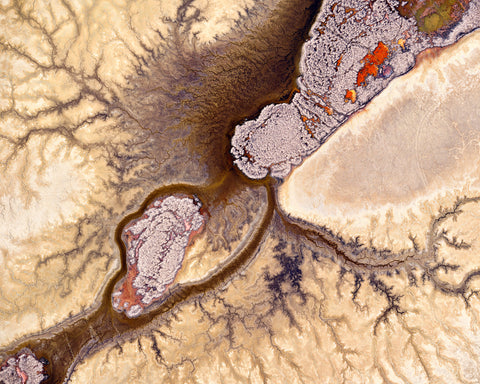
As a photographer, our ability to abstract the landscape is emphasised in aerial photography. In landscape photography, a horizonal line usually indicates the horizon, suggesting time and place by anchoring an image and creating depht. By angling the camera down, abstracting or often excluding the reference point of the horizon, allows the photographer to focus on texture, pattern, shape, balance, contrast, and colour.
Benefits of shooting oblique?
The main advantage of oblique aerial photographs is that the photographs can often include the horizon, to improve interpretation. They make the image easy to understand and often lend themselves to better known landmarks and/or terrain with greater relief (ie mountains). If you want to capture images that tell a story of ‘where’, then the oblique angle is often the best. For example, a photograph of a Sydney Harbour will provide us a perspective the way it appears to us when we look at it.

2. Pre-flight Planning and Previsualisation
Flying in circles looking for photographs could be very exciting and entertaining until you land and find out how much money you spent without really accomplishing anything. Do your research beforehand and get a good idea about what you want to photograph and how you will accomplish it. What side of the aircraft will you be shooting from? What altitude or different altitudes are required? When will the light be the best? Do you want to shoot oblique or top-down?
I find that satellite imagery can be very helpful in the flight planning phase as I can help identify interesting topography or features in the landscape you may want to photograph. In addition, don’t be afraid to reach out to the pilots or other locations who have a intimate understanding of the landscape you wish to photograph – this coupled with an appreciation of environmental factors such as seasons and tides you will be well on the path to planning a successful flight. Often you will find that one flight will not produce all the required images due to some of these decisions and a second or third flight might be required at a different time of day, different season, different tide, or a myriad of other factors.
Once you have done your homework, it is time to find your aircraft. Your budget is likely the biggest decision here, as well as the type of aircraft available. Hire a good pilot, preferably one that has experience working with photographers! Pilots do vary and some are better at others when it comes to understanding the requirements of aerial photography. Go over a flight plan and stick with it. The most important part of the shoot is that the pilot calls the shots and has the final say in what will be done. They know the regulations, safety issues and the bottom line; they are responsible for you, the aircraft, and the people on the ground!

3. Planes, Helicopters and Flying Machines
Helicopter
There are numerous ways of capturing aerial photography and out of a helicopter is by far the most used and likely the easiest platform to work from under most circumstances. When used specifically for photography, most pilots will allow the removal of a door, leaving a large workable shooting area. This can be very advantageous, as you can literally pan the camera to keep the subject within the frame while still traveling in a straightforward direction. Helicopters also have very impressive turning characteristics so you will find that there is far less lost time as you circle back to shoot from a different altitude or angle. In addition, a helicopter will also provide the opportunity to hover at slow speed over a subject – a significant advantage over light aircraft.
There are a few downsides to shooting from helicopters, however. First is the cost – the cost of an hour’s charter can range from $1,000 in a Robinson 44 excess of $2,000 or more for a larger jet ranger or equivalent. It is very impressive how much you can shoot in a few hours, but the credit card can take a big hit after you land.
Fixed Wing Aircraft
Likely the bulk of aerial photography is done with fixed wing aircraft. While not as manoeuvrable as helicopters they are still very competent shooting platforms under the right conditions. Try to get an airplane with a high wing, like the Cessna 172 Skyhawk, to get the best view. The low winged aircraft really limit the view below! Even with high wings, the wing strut and/or landing gear may get in the way, so it’s imperative to understand the limitations of the aircraft you are chartering and ensure you communicate effectively with your pilot to ensure such limitations don’t compromise your images!
I try to fly with the doors off, but often you will be flying either shooting through a small opening window or through the glass. Either way, positioning of the aircraft is very critical to line up the image, so a good pilot—preferably with experience working with photographers—is a must. What’s the biggest advantage of a fixed wing platform? Cost! Likely 1/4 or less of what the helicopter will cost. Furthermore, a plane has a higher cruising speed, and thus you can cover significantly more territory in a plane than a helicopter.

4. What to do with doors or windows?
Aerial photography, from a technical standpoint, can be both a challenge and an exhilarating experience. The cost involved in both the charter of the aircraft and the purchase or rental of expensive camera equipment is too great for the image quality to be diminished by the scratched plexiglass of the aircraft’s windows. Life is certainly easier without doors, however, be aware of wind buffeting if you lean out a little too far. It’s best to keep the lens behind the plane of the window as the lens can catch the slipstream if protruding from the side of the aircraft. If the pilot is not comfortable, or the licensing restricts the removal of doors, be sure to ask the pilot if there are any retractable or hinged windows.
If you can’t remove the doors or open windows, wear dark clothing and make sure to have a lens shade installed. Most windows have blemishes and scratches, so you will probably want to shoot wide open to limit the depth of field. Window tint might also be a problem, although this can generally be cleaned up in Photoshop or some other editor. I recommend shooting RAW for this reason.
5. Communication with your pilot
It's essential to express your intentions and hopes with the pilot before your flight, so you're both on the same plane! After all, you and the pilot are on the same team. Having a mutual goal in mind before and during the flight is imperative. While requests should be expressed, it's also important to remember that the pilot knows best, and they are subject to civil aviation and licencing restrictions.
They've flown around the area more times than you know, and probably know it like the back of their hand! Remember that in the air the pilot and the plane are your tripod, if you want to get closer to a subject, a different angle or perspective you need to communicate effectively with the pilot. You will likely have high frequency radio communications with the pilot, but clear and concise instructions are most effective. Using directions analogies such as clock dials can make communications easier. Also, remember that wind buffeting often renders radio communications useless causing a crackling static sound through the headset, so it is often good to use hand signals as well.

Finally, respect your pilot and their decisions in those critical moments. Their job is to keep you and your party safe, so listening to their suggestions, comments, and decisions in the moment are very important.
6. Prioritise Shutter Speed
This may seem obvious to some, but it is necessary to deliberately call out under its own title. To avoid any kind of motion blur or soft images, you have to use every tool available to keep the shutter speed as fast as possible. Not just because you are travelling at up to 120 knots, but because a plane vibrates. A lot.
I try to keep my shutter speed to at least 1/2000 of a second. Whilst you can often get sharp images at 1/500 or even lower, maintaining a minimum shutter speed of 1/2000 will ensure that all images are sharp. The key here is knowing that when capturing an image on an orbit, the corner of the frame is travelling faster relative to the centre of the frame. Also, the longer the lens the faster you will need to maintain your shutter speed.

7. Choose your lens carefully
Aerial photographs can translate spatial mapping into a game, where a mountainous crest, beachy shore, or a protruding landmass can exist independently and abstracted from the contexts that typically define its features. The aerial viewpoint can challenge traditional perspectives and encourage viewers to see the natural world with fresh eyes. Geographic formations take on artistic qualities, creating enticing and provocative imagery. Not only is it the photographer’s choice of shooting angle of oblique or top-down that enables how abstract a feature can appear, but also the choice of focal length. Generally, the longer the lens the more abstract the image may appear as you can isolate a smaller section of an overall scene.
-
Wide Angle Zoom (such as 16-35mm) - for capturing a wide landscape and interior photo of the plane or helicopter
-
Mid-Range Zoom (such as 24-70mm) - great for capturing a wide landscape or tight shot for the texture or close-up shots of your subject; also great for interior photos, as well as taking portraits of the people inside the plane or helicopter
-
Wide Fixed Prime (such as 35mm) - great for capturing a wide landscape in low light such as the blue hour.
-
Mid Focal Length Prime (such as 50mm or 85mm) - great for capturing a tight landscape images and the top-down perspective.
-
Telephone Zoom (such as 70-200mm) - great for capturing a faraway or to get some texture on your subject
8. Camera Settings - Manual vs Automatic?
Ultimately this comes down to the confidence of the photographer, how intimately you know your equipment and the idiosyncrasies of the equipment. The key here is to prioritise your shutter speed to around1/2000th of a second, this is typically best done via full manual control, shutter, or aperture priority modes.
Manual
With the risk of sounding obvious, manual control gives the photographer the most control over the settings. If shooting top-down and in contrast with usual landscape settings, you can get away with wider apertures when shooting, as the focal plane has limited depth. Accordingly, you can shoot as fast as F/2.8 without losing sharpness due to depth of field. Typically, I like to maintain an aperture range of F/4-F/8 with Auto ISO and full control over the shutter speed.
Aperture Priority
Some camera systems have a minimum shutter speed setting (such as the Sony mirrorless system), this allows the photographer to set a minimum shutter speed that caps the shutter at a threshold and set the camera to aperture priority mode using Auto ISO. If not fully confident using manual settings and your camera has a minimum shutter speed functionality, this gives the photographer the most control.
Shutter Priority
Shutter priority lets you dial in the shutter speed and the camera automatically adjusts the aperture and ISO. This is less desirable as the camera automatically adjusts two of the three exposure control mechanisms.
Focus
When you are in an aircraft, you are often at least 1,000 feet above the ground. At this height, the focus distance to the ground is effectively infinity. Set your camera at the infinity mark on your lens and leave it there for your entire photo shoot. Many photographers manually set their lenses to infinity and use gaffer’s tape on the focus ring to prevent it from rotating.
Use AF as you get closer to the ground, especially with a longer lens, like the 70–200mm. If you end up photographing other airplanes while you are in the air, use AF to track the movements. Remember if you’re using a zoom lens, then you will need to be shooting in AF mode regardless.
Other
Flights also come with turbulence and unexpected shaking, so if your camera has an image stabilization option, now is the time to use it!

9. Vibrations are your enemy!
Due to the vibrations of the plane, it is also critical to always handhold your camera. Leaning or resting the camera or lens on any part of the plane would cause it to vibrate and create unnecessarily blurry images. Whatever you do, do not place any part of your body or camera against the sides of the helicopter, as the vibration will transfer over to the camera and cause soft images.
10. Take lots of memory and charged batteries!
Nothing is worse than being in the moment when a battery drains or your memory card fills up! Make sure to put your batteries on a charger the night before your flight to ensure they are at full capacity. Further, a trick I like to do during my aerial photography flights is to keep extra batteries in my zipped pockets, for easy access when one gets drained.
To ensure you have enough memory space for your aerial tour, start the flight with a formatted card and, ideally, the largest card you have. You can typically take up to 1,500-2,000 images over an hour’s flight, which would fit on a 128GB card.
Keep in mind that you may want to pace yourself, depending on what type of storage you have on hand during your flight. The worst thing is to run out of storage mid-air! Pack three extra cards, just to be safe. Again, put these into zipped pockets for easy access.

11. What about filters or lens hood?
If you are prioritising your shutter speed to be at least 1/2000, you will need all the available light possible without compromising your ISO. As a result, any neutral density filter or polarising filter is surplus to your needs and you should leave it at home. In addition, if shooting top-down the benefits of polarisation diminish thanks to the angle of the shooting plane.
All gear and other equipment needs to be securely fastened to your body or a harness, you don’t want to think about what might happen if you drop a lens or camera out the door! Your pilot will probably tell you to ditch the hood, but if they don't, it's probably a good idea anyway. There are many reasons to leave that lens hood at home. If it falls, it could damage the aircraft, hurt someone on the ground, or even limit your ability to move freely in the cabin. If you're worried about glare, play around with your angles, or just use your hand to shield the lens in that particular moment.
If possible, use a few different cameras so you can keep changing lenses and memory cards down to a minimum.

12. Other considerations – time of day, weather, tides
Do you want to shoot during sunrise? Sunset? Harsh middle-of-the-day light? Consider these light conditions before flying as each of these times have a different impact on the landscape from the air. Early morning light casts longer, deeper shadows and greater contrast. Light during the middle of the day is better when flying over water as the angle of the light penetrates the water and saturates the colours better. Some airports and companies have restrictions on when they are allowed to take off, so be sure to speak to your pilot first.
Weather can change rapidly, so keep a flexible schedule (and attitude!) when planning your aerial photography flight. We highly recommend booking your aerial photography flight in the early part of your trip, so you have time to reschedule if plans go awry. Clouds in the sky? Don't fret. Clouds can add a certain drama to a photo that a sunny day simply can't! Know that no matter how many times you visit an area, it can look completely different.